cs4250 Notes: 10-09 I2C Display Lab
In this lab you’ll wire an ELEGOO SSD1306 128x64 I2C OLED to an SG2000 board (Pine64 Oz64 or Milk-V Duo S) and drive it two ways: from Linux with a small Python program, and from the little C906 core with an Arduino sketch loaded over remoteproc. Every command here is verified on both boards.
Full source for the support code is on the source page, and the I2C/SSD1306 protocol details are on the protocol page. All of the files in this lab are also in the sg2000-hints repo if you would rather copy files than paste them.
Working in pairs #
You’ll be split into randomly assigned pairs. Each pair gets one board (Milk-V Duo S or Pine64 Oz64) and one OLED. Suggested budget:
- ~5 min — get connected
- ~10 min — wire the OLED and detect it
- ~10 min — show text from Python
- ~10 min — show text from the Arduino / C906 core
- ~10 min — the drawing challenge
Step 1: A working image #
If you already have an image with remoteproc support that boots on your board, start from there. Otherwise flash one of these:
Boot the board, then connect over one of:
- USB (RNDIS):
ssh debian@10.42.0.1 - WiFi:
ssh debian@<your-board>-wifi
Log in as debian / rv. (A root / rv login also exists.) Confirm you have passwordless sudo:
sudo -n true && echo "sudo ok"
Step 2: Wire the OLED #
Both boards expose the same 26-pin RPi-style header. We’ll use bus IIC1 on header pin 11 (SDA) and pin 13 (SCL).
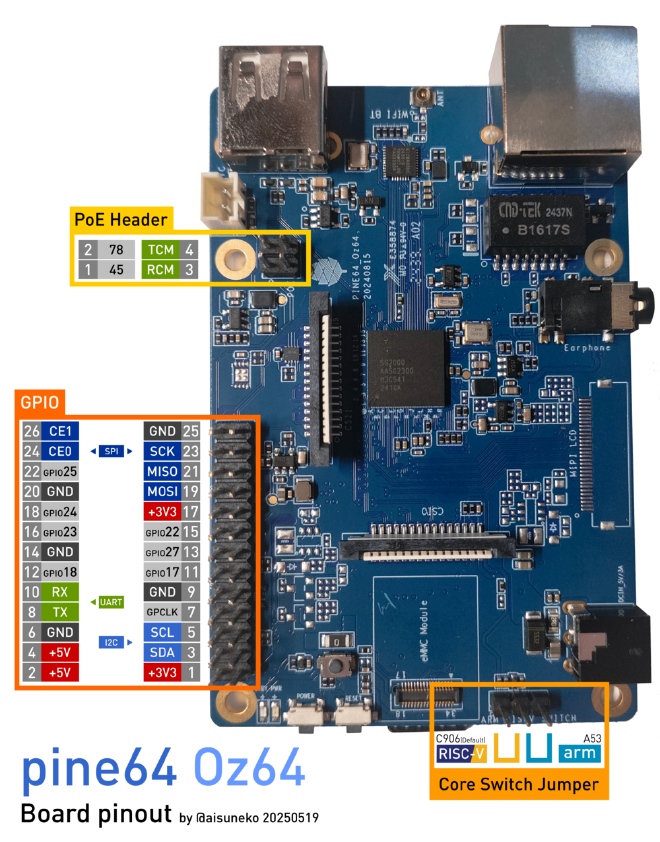
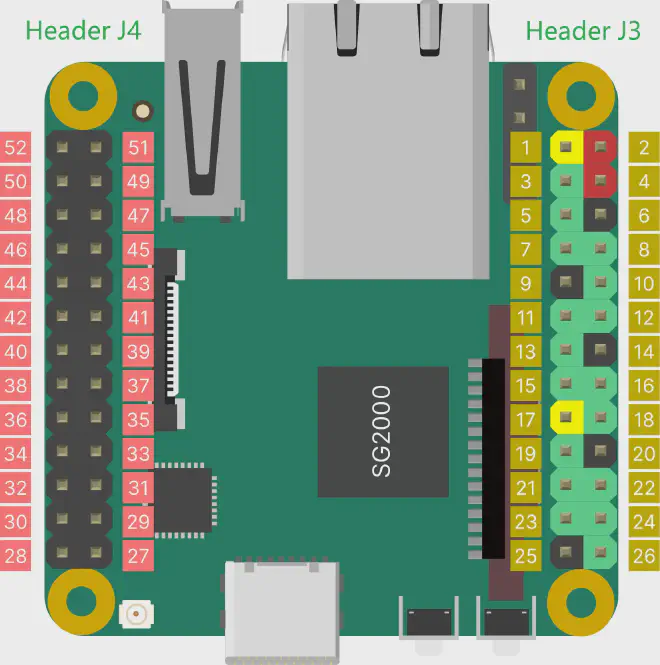
Wire the OLED to the board:
| OLED pin | Board pin | Notes |
|---|---|---|
| GND | 9 | ground |
| VCC | 1 or 17 | 3V3 |
| SDA | 11 | IIC1_SDA |
| SCL | 13 | IIC1_SCL |
Then route the bus and check that the panel answers:
sudo duo-pinmux -w B11/IIC1_SDA
sudo duo-pinmux -w B12/IIC1_SCL
sudo /usr/sbin/i2cdetect -y -r 1     # expect a single device at 3c
Troubleshooting:
- Nothing on the bus? Swap SDA/SCL first — it’s the most common wiring mistake.
- Still nothing? Check 3V3 (pin 1 or 17) and GND (pin 9).
i2cdetectlives in/usr/sbin, not on the defaultPATH— use/usr/sbin/i2cdetect./dev/i2c-*needssudo(or membership in thei2cgroup).- Pinmux is NOT persistent — re-run the two
duo-pinmuxlines after every reboot.
Step 3: Show text (Python) #
Save this as oled.py on the board; the driver ssd1306.py is on the source page.
import sys

from ssd1306 import SSD1306


def draw(dev, text):
    # Task 5: replace this with pixel drawing
    dev.text(0, 0, text)


def main():
    text = " ".join(sys.argv[1:]) or "Hello, OLED!"
    dev = SSD1306(bus=1, addr=0x3C)
    try:
        dev.clear()
        draw(dev, text)
        dev.show()
        print(f"wrote {text!r} to /dev/i2c-1 @ 0x3c")
    finally:
        dev.close()


if __name__ == "__main__":
    main()
Copy both files to the board and run it:
scp ssd1306.py oled.py debian@<board>:~
ssh debian@<board>
sudo python3 oled.py "your message here"
It should print wrote 'your message here' to /dev/i2c-1 @ 0x3c and the message should appear on the OLED.
Step 4: Show text (Arduino) #
This sketch runs on the little C906 core via remoteproc, not on the Linux side. It bit-bangs I2C on the same two pins (11/13) — no Wire library, no kernel driver — so the Linux pinmux from Step 2 is irrelevant to it. The support headers ssd1306.h and font5x7.h are on the source page. The built-in font is uppercase-only, and the 128px panel fits about 21 characters per line.
/* oled-text.ino - drive the SSD1306 from the little C906 core with no OS,
 * no Wire library, and no DesignWare controller: bit-bang I2C on the header
 * pads and reuse the same transport-agnostic ssd1306.h as the Linux examples.
 *
 * VERIFIED on the Milk-V Duo S via remoteproc. Header pin 11 = XGPIOB[11] =
 * IIC1_SDA, pin 13 = XGPIOB[12] = IIC1_SCL. The little core runs in M-mode,
 * so the register addresses below are physical: no /dev/mem, no mmap.
 *
 * NOTE: this bit-bang path does NOT use the kernel I2C controller; it
 * reprograms the B11/B12 pad-mux registers as plain GPIO itself.
 *
 * Build: arduino-cli compile --fqbn sophgo:SG200X:duos --build-path build oled-text
 */
#include <string.h>

#include "ssd1306.h"

#define MESSAGE "Hello from C906"

#define MUX_B11 0x03001134UL /* XGPIOB[11] pad function (header pin 11, SDA) */
#define MUX_B12 0x03001138UL /* XGPIOB[12] pad function (header pin 13, SCL) */
#define GPIOB_BASE 0x03021000UL
#define SDA 11
#define SCL 12
#define FUNC_GPIO 3u

#define DR (GPIOB_BASE + 0x00)
#define DDR (GPIOB_BASE + 0x04)
#define EXT (GPIOB_BASE + 0x50)

static inline uint32_t r32(uint32_t a) { return *(volatile uint32_t *)a; }
static inline void w32(uint32_t a, uint32_t v) { *(volatile uint32_t *)a = v; }

/* open-drain emulation: drive low as output, release (high-Z) for high */
static void pad_out(int bit, int high) {
    uint32_t d = r32(DR);
    if (high)
        d |= (1u << bit);
    else
        d &= ~(1u << bit);
    w32(DR, d);
    w32(DDR, r32(DDR) | (1u << bit));
}
static void pad_rel(int bit) { w32(DDR, r32(DDR) & ~(1u << bit)); }
static void sda_low(void) { pad_out(SDA, 0); }
static void sda_rel(void) { pad_rel(SDA); }
static void scl_low(void) { pad_out(SCL, 0); }
static void scl_rel(void) { pad_rel(SCL); }
static int sda_val(void) {
    pad_rel(SDA);
    return (int)((r32(EXT) >> SDA) & 1u);
}

static void half(void) { delayMicroseconds(5); } /* ~70 kHz */

static void i2c_start(void) {
    sda_rel();
    scl_rel();
    half();
    sda_low();
    half();
    scl_low();
    half();
}
static void i2c_stop(void) {
    sda_low();
    half();
    scl_rel();
    half();
    sda_rel();
    half();
}
static void wbit(int b) {
    if (b)
        sda_rel();
    else
        sda_low();
    half();
    scl_rel();
    half();
    scl_low();
    half();
}
static int rbit(void) {
    sda_rel();
    half();
    scl_rel();
    half();
    int v = sda_val();
    scl_low();
    half();
    return v;
}
static int wbyte(uint8_t v) {
    for (int i = 7; i >= 0; i--)
        wbit((v >> i) & 1);
    return rbit(); /* 0 = ACK */
}

static int wbuf(const uint8_t *b, size_t n) {
    i2c_start();
    if (wbyte((uint8_t)(OLED_ADDR << 1)) != 0) {
        i2c_stop();
        return -1;
    }
    for (size_t i = 0; i < n; i++)
        (void)wbyte(b[i]);
    i2c_stop();
    return 0;
}

/* transport callback expected by ssd1306.h */
static void oled_cb(void *ctx, const uint8_t *buf, size_t len, int is_data) {
    (void)ctx;
    uint8_t tmp[1 + 64];
    for (size_t off = 0; off < len; off += 64) {
        size_t n = len - off;
        if (n > 64)
            n = 64;
        tmp[0] = is_data ? 0x40 : 0x00;
        memcpy(tmp + 1, buf + off, n);
        (void)wbuf(tmp, n + 1);
    }
}

static oled_t o;

void setup() {
    w32(MUX_B11, (r32(MUX_B11) & ~0x7u) | FUNC_GPIO);
    w32(MUX_B12, (r32(MUX_B12) & ~0x7u) | FUNC_GPIO);
    sda_rel();
    scl_rel();

    oled_init(&o, oled_cb, NULL);
    oled_text(&o, 0, 0, MESSAGE);
    oled_text(&o, 0, 12, "SSD1306 I2C");
    oled_flush(&o);
}

void loop() {
    delay(1000);
}
On your laptop, create a folder named oled-text/; save the sketch there as oled-text/oled-text.ino, and save ssd1306.h and font5x7.h in the same folder (Arduino requires the .ino name to match the folder name). Run the build on your laptop — the board has no arduino-cli.
Build it (choose your board):
arduino-cli compile --fqbn sophgo:SG200X:duos --build-path build oled-text
# or --fqbn sophgo:SG200X:oz64
Load it via remoteproc:
scp build/oled-text.ino.elf debian@<board>:/tmp/oled-text.elf
ssh debian@<board>
sudo cp /tmp/oled-text.elf /lib/firmware/oled-text.elf
S=/sys/class/remoteproc/remoteproc0/state
[ "$(cat $S)" = running ] && echo stop | sudo tee $S
echo oled-text.elf | sudo tee /sys/class/remoteproc/remoteproc0/firmware
echo start | sudo tee $S
cat $S                       # -> running
(If stop prints Invalid argument, that’s harmless — the core is already offline.)
The sketch sets its own pad mux, so no pinmux is needed for this path. If you go back to the Python path afterward, re-run the Step 2 pinmux.
Step 5: Draw a smiley #
Task: modify either program to draw a smiley face instead of text. No worked example is given — this one’s on you.
The primitive you need is the pixel:
- Python:
dev.pixel(x, y)to light a pixel,dev.clear()to wipe the framebuffer,dev.show()to push it to the panel. - Arduino:
oled_pixel(&o, x, y),oled_clear(),oled_flush().
The protocol page explains how the panel’s pages/columns map to (x, y) and shows how to light a single pixel by hand.
ELEGOO resources for the display and its kits:
- https://www.elegoo.com/pages/download
- https://www.elegoo.com/blogs/arduino-projects
- (optional) SSD1306 datasheet: https://cdn-shop.adafruit.com/datasheets/SSD1306.pdf
Troubleshooting #
i2cdetectshows nothing. Swap SDA/SCL first; then check 3V3/GND; make sure you usedsudoand/usr/sbin/i2cdetect.- Worked before a reboot. The pinmux isn’t persistent — re-run the Step 2
duo-pinmuxlines. i2cdetectnot found. It’s in/usr/sbin; use the full path orsudo i2cdetect./dev/i2c-*permission denied. Usesudo, or add your user to thei2cgroup.- Arduino path does nothing. Confirm the
.elfcopied to/lib/firmware/and thatstatereadsrunning; remember this path bit-bangs its own pads and ignores the kernel pinmux. - Nothing on the panel after
start. Do not run the.elfas a Linux process — it’s a bare-metal RISC-V image and will fault; it must be started throughremoteproc.